#blender tutorial
Explore tagged Tumblr posts
Visit Tumblr Blog
Explore Tumblr blogs with no restrictions, modern design and the best experience.
Last Seen Tumblr Blogs


Fun Fact
Tumblr was named as a finalist in Lead411’s New York City Hot 125 in Aug 2010.
Text

youtube
How to make a lollipop in blender! ✨
#blender#3d art#3d illustration#blender render#blendercommunity#art#candy#lollipop#3dfoodart#3d model#blender tutorial#Youtube
8 notes
·
View notes
Text
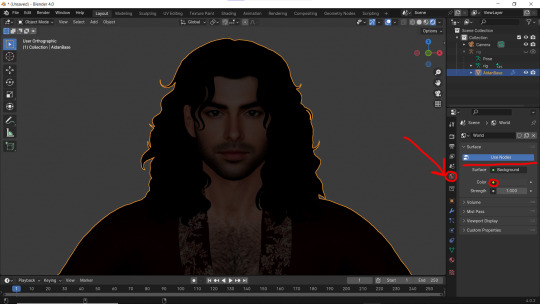
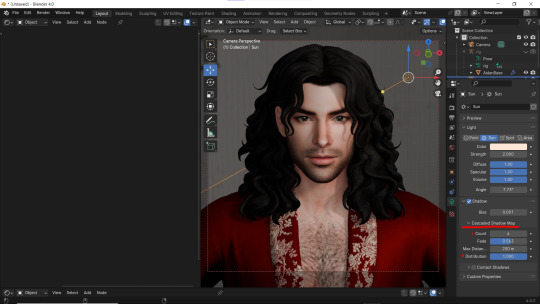
How to apply textures in Blender 4.0 For newbies (´。• ᵕ •。) ♡
So you imported your lovely doll into Blender 4.0, but the textures are messed or missing, here's how to apply base simple textures from the scratch!
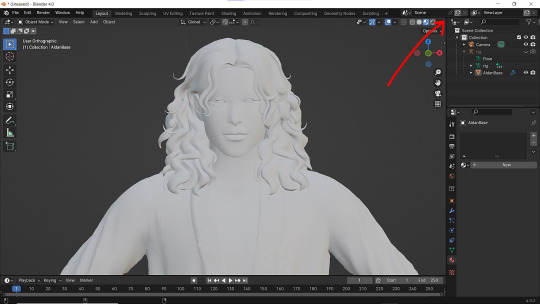
I'm using Blender 4.0.2 (Sorry 4.3, but your EEVEE is currently nothing but tears for me) and my lovely Aidan is here to assist me. SO! Seat your bum comfortable and let's begin!
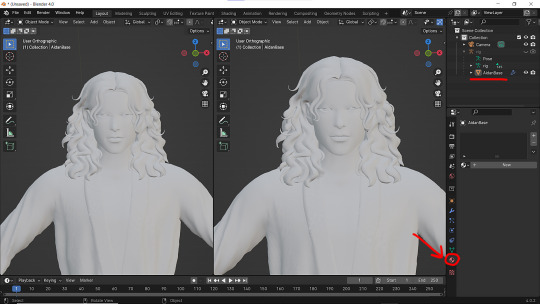
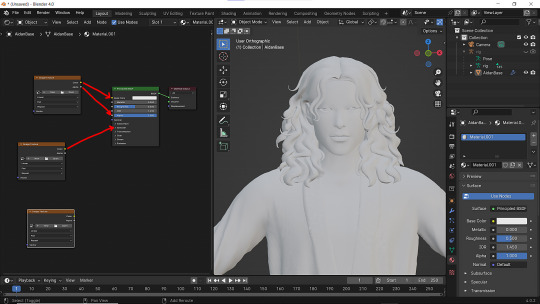
1 - Split your working space by pulling the corner of the screen:
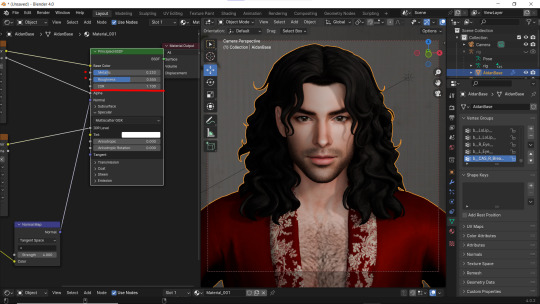
2 - Then click on Material with your mesh selected.
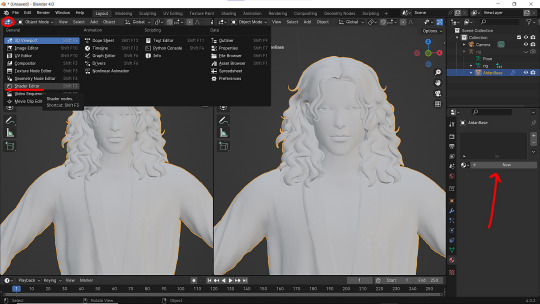
3 - Pick Shader Editor on the left part of the screen and hit New in the Material on the right. You'll get something like this:
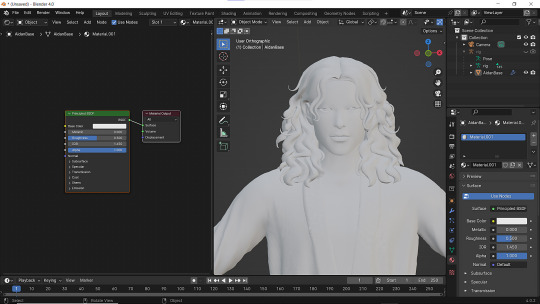

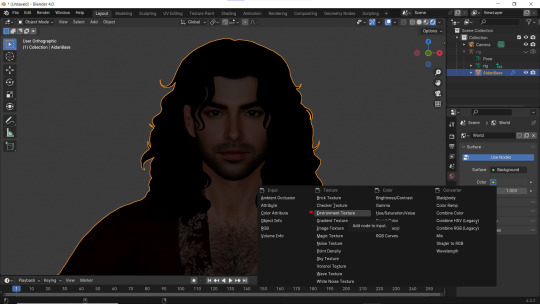
4 - On the left choose Add - Texture - Image Texture. We need three of them at very least :D
5 - First Image texture: Connect Color to the Base Color and Alpha to Alpha. Second Image texture connect to Specular IOR Level. Don't forget to upload your textures! Color - is well... color pics. Specular looks like Black/White pics and Normal is purple!
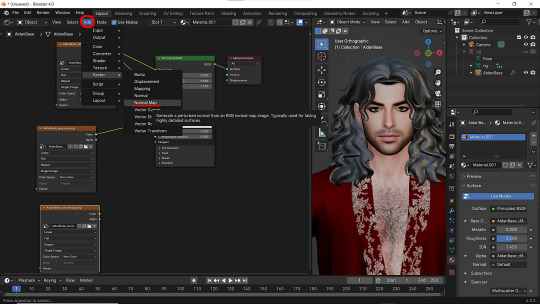
6 - Now add Normal Map. And connect it like on the picture below:
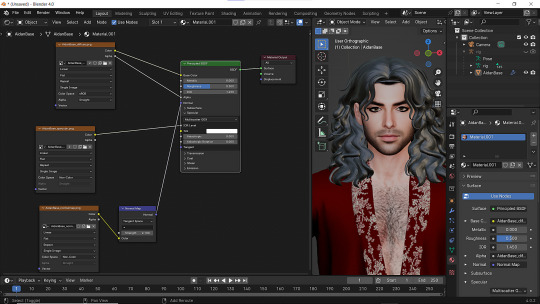
7 - Specular and Normal maps should be NON - COLOR in the Image Texture - Color Space
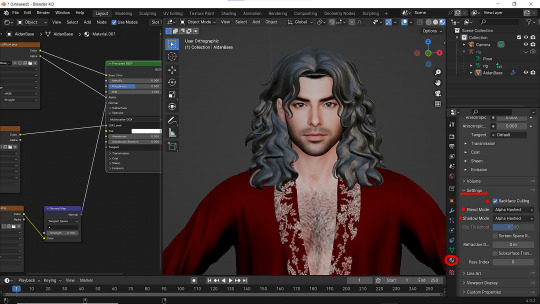
8 - Turn on the alpha. In Material - Settings - Blend Mode/Shadow Mode change on Alpha Hashed + You can check Backface Culling. In some cases it's vital :D
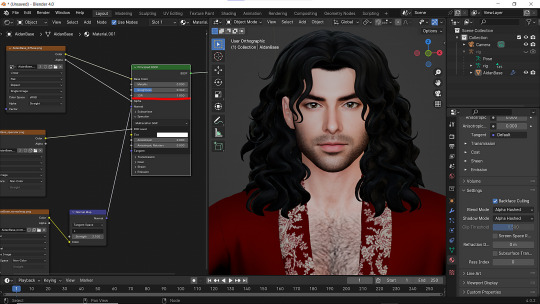
9 - Change the Specular settings in case of weird shining by changing IOR and Roughness parameters.
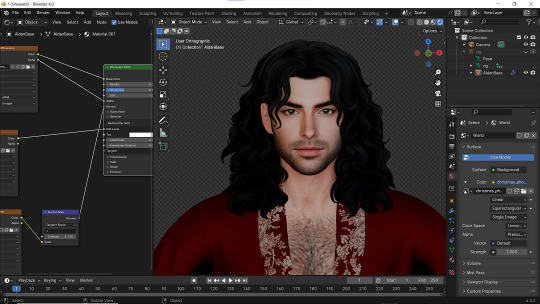
10 - You did it! (ノ◕ヮ◕)ノ:・゚✧
#WistfulTutorialSims4#the sims 4 blender#sims 4 blender render#blender 4.0#blender eevee#sims 4 tutorials#blender tutorial#sims 4 blender render tutorial#blender render
264 notes
·
View notes
Text
Basic Sims Blender Render Tutorial
Rendering seems like an intimidating process to many, and a lot of Simmers feel like they're in the dark and lost about where to even begin with rendering. And gatekeeping definitely doesn't help anyone!
This no-frills tutorial's not entirely comprehensive and assumes that you know some basics of Blender (how to move around, and switch tabs, and use basic tools). It's also not an absolute, perfect tutorial. My shaders and techniques are not perfect at all, and there are many other creators who have way more advanced rendering skills than me, but these are the steps I take for my current renders and they work for beginners. It's also great because it prevents you having to go back into CAS and redoing the Blend setup each time if you want to keep making renders of the same Sim.
GOOGLE SLIDES TUTORIAL: https://docs.google.com/presentation/d/1qI84QstCfa7E-F6b7qzRPuHW_eou_N4d/edit?usp=sharing&ouid=109770128121660962892&rtpof=true&sd=true
Please let me know if anything's missing or confusing. I won't be able to help with every issue (as Blender brings forth many), but if you have a question about something you see in my tutorial in specific, feel free to shoot me a message! Also, if you are one of the more knowledgeable creators, def let me know if there's anything I can do to improve or something I should add to the tutorial.
Thank you to all my friends over the last two years who helped me learn how to render! And to the Simmers who aren't gatekeepers and find the same joy of sharing with the community as I do. I'm also grateful to Simsonico for their Youtube Tutorial, which I recommend viewing.
If you're hesitant about trying out renders, know that I was too. Renders allow for more creative compositions and item placements. They also create higher quality pictures than in-game. The only downsides are the time it takes to render and set up everything and the fact that pretty much all Blender scenes are atrociously perma-paywalled. This isn't an issue if you want to build your own scenes or greenscreen, though! I recommend trying at least a few times just to see how you feel.
#mydl#simblr#the sims 4#the sims#ts4#sims tutorial#blender tutorial#sims blender#ts4 tutorial#sims blender tutorial#sims#simscommunity
81 notes
·
View notes
Text
CC Creation Tutorial: Smooth Seams in Blender

In this tutorial, I will show you how to make your mesh seams smooth inside Blender (no Milkshape required!) and walk you through the process step by step. We will make a perfectly smooth mesh and transfer the normal data from that mesh to our main mesh using the Data Transfer modifier.
I am using Blender 3.6 in this tutorial (though you should be able to follow along using other versions as well)
You do not need to have much previous knowledge to follow this tutorial, but I assume you know some basics in Blender like how to select, things, navigate around, etc, and know how to import the meshes and put them into Blender.
For this tutorial, I exported the Sims 3 afbodyEP4DressPromBigBow mesh with TSR Workshop. You can use any clothing mesh you like though, and works on any meshes, not just Sims 3 ones.

This is our mesh. You can already tell that it has the dreaded seams on the neck and the rest of the body.

First, we need to make a copy of the mesh (in Object mode, select the mesh and hit Ctrl+D Shift+D to duplicate it, then hit Esc to stop it from moving around).
Rename the mesh (I added Seamless to the mesh name).
Make sure the original mesh is hidden (click the eye symbol) and select the Seamless mesh.
Press the Tab key to go into Edit Mode.

Now we select the parts that we want to have smooth seams. Let's select everything that is skin (you can select a litte piece of the mesh and then press Ctrl+L to select the entire piece)!

Now, press M and in the menu, choose By Distance. (in older versions, this is called Remove Doubles).
This will remove all double vertices at the seams on the selection we made.

It will show you how many vertices it removed. The skin looks nice and smooth!
Let's switch back to our original mesh: Make sure you deactivate the eye on the Seamless mesh and activate the eye again on the main mesh. Then, select the main mesh.

Now, let's add a data modifier to our main mesh. Click the blue wrench icon in the vertical list of the properties panel and then onto Add Modifier, then choose Data Transfer from the list.

As the source, we choose our Seamless mesh.

Also toggle on Face Corner Data and click the Custom Normals button.
Hold on, there is a message saying that we should enable Auto Smooth in Object Data Properties. Let's do that next! (if the message does not appear for you, maybe Auto Smooth is already on).

Click the green inverted triangle button and in the Normals section, toggle on Auto Smooth.

Now we can switch back to the modifier tab by clicking the blue wrench icon again.
But hang on, what happened to our mesh? There are now black spots over the dress and shadows on the legs!

This is due to the Data transfer modifier's Mapping setting. If we change it to Topology, our mesh goes back to normal again. Phew!

Now that the normals look good, we can start the transfer of our new smooth normals from the seamless mesh to our main mesh. To do that, we hit the Generate Data Layers button. This button works destructively, so you cannot undo what it did, just FYI.

Note: On newer versions of Blender, Generate Data Layers may not be enough to transfer the normals and you may need to apply the modifier instead.
You can toggle the modifier's visuals on and off with the little screen icon to see the results after you click Generate Data Layers to see if it stuck. If it did not (and you see the seams of your base mesh when toggling it off), try to apply it instead.

I switched from textured to solid shading because the differences are just more noticeable in this mode. This is how our mesh looks now with the modifier turned off.
Because we clicked the transfer button, the normals have been permanently applied to our mesh. The skin is smooth now, and so is the dress (even though we did not smooth that one, hmm...)

If we toggle the modifier back on, suddenly the dress has seams again! What's going on there? I'm not exactly sure why, but Auto Smooth seems to be doing some smoothing on the dress mesh as well.
I am not sure if this is normal behavior or not, but let's pretend that this did not happen and the modifier in fact did not smooth the dress.
Maybe we just forgot to smooth some areas on the Seamless mesh that we noticed only later on. That's no problem. We simply modify our Seamless mesh again!

So let's swap back to the seamless mesh and select it (remember to click the eye icons so only the Seamless mesh is visible).

Let's select the main dress parts and press M -> merge by distance on them. We cannot smooth the whole dress all at once, because then that would remove some seams that we want (like those for the backfaces and the middle section of the dress where the bow is attached).
If we remove the wrong seams, we ruin our normals and will have black splotches.

Now, let's select the backfaces and areas we left out before and repeat this process: M -> merge by distance.

Look at how perfect our Seamless mesh is looking now! Now, let's transfer those beautiful normals to our main mesh.
Select the main mesh and toggle the eye icons again, to hide our Seamless mesh and reveal our main mesh.

Once again, we will use the Generate Data Layers button in our Data Transfer modifier. If you have previously applied the modifier, just add the modifier again to the main mesh and use the settings shown here.
And that's it, you are done! You have a perfectly smoothed mesh that you can export now.

Final Note: it is best to transfer the normals at the very end of your meshing process because any action that recalculates the normals can reset our custom-made smooth normals again.
Of course, you can simply use the Generate Data Layers button again to re-add them, but it saves you time to only do this step at the end.
I almost forgot to say: You still have to use Mesh Toolkit to fix the seams on the edges of your mesh and do the usual shenanigans.
179 notes
·
View notes
Text
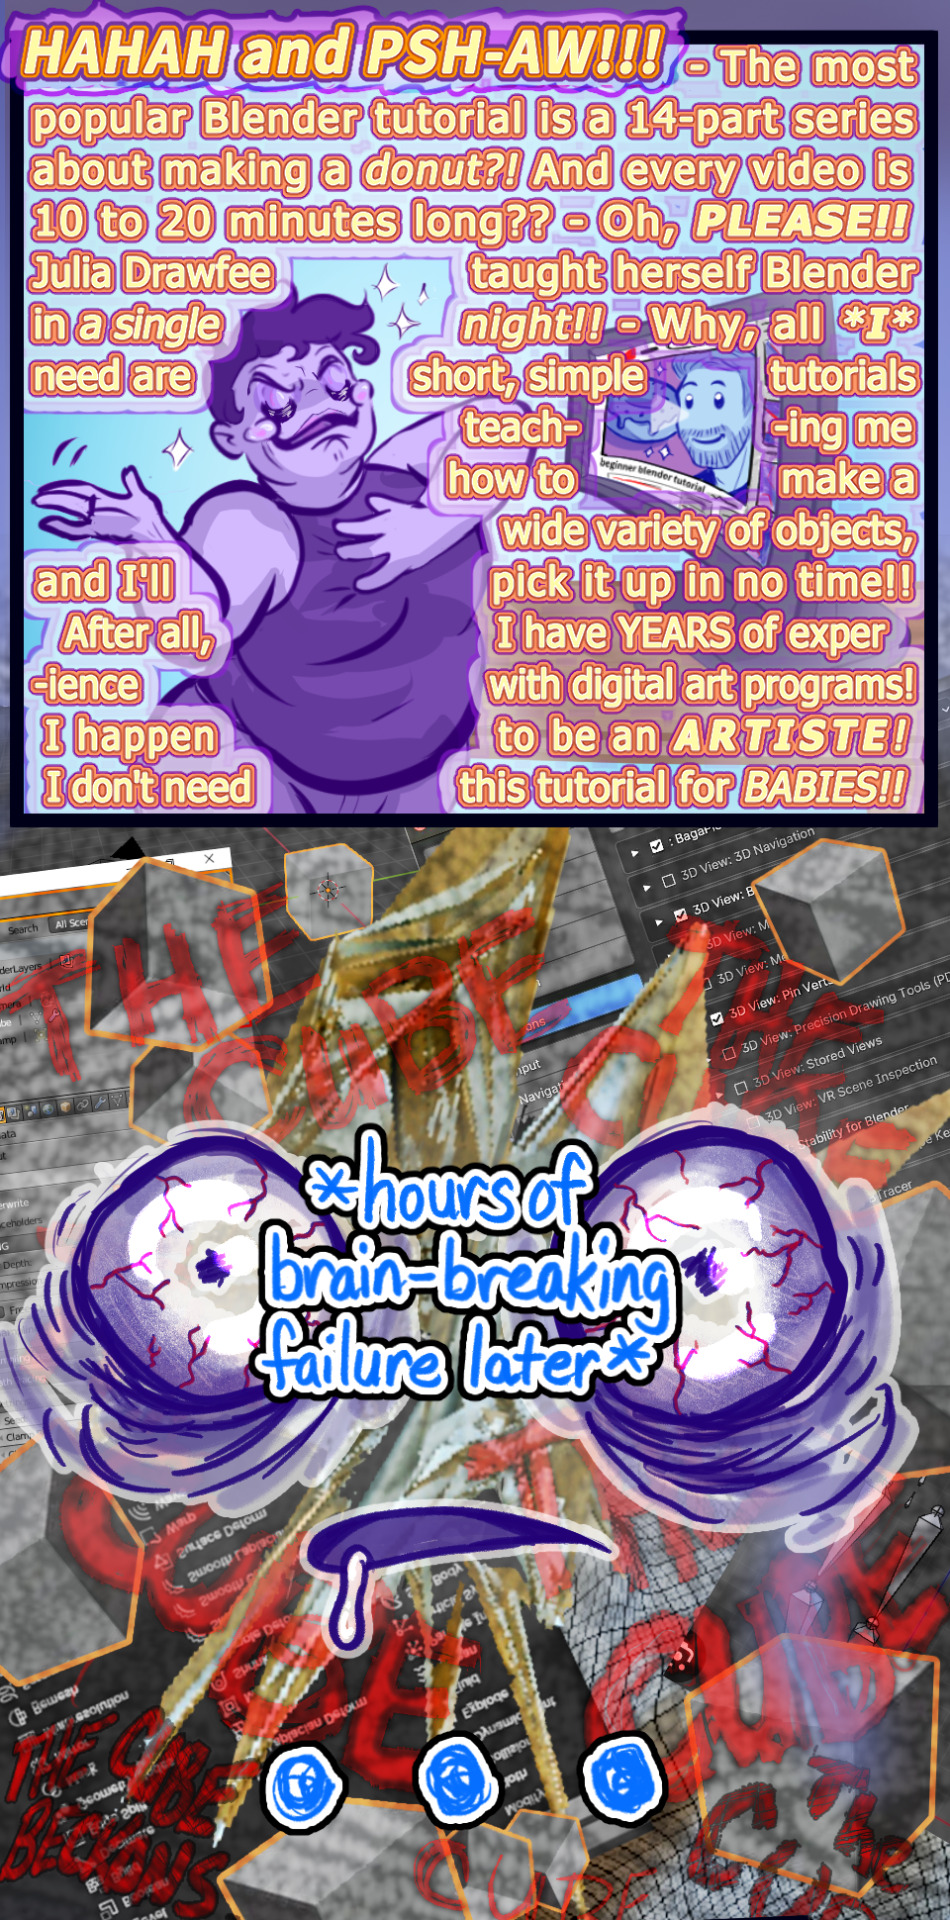
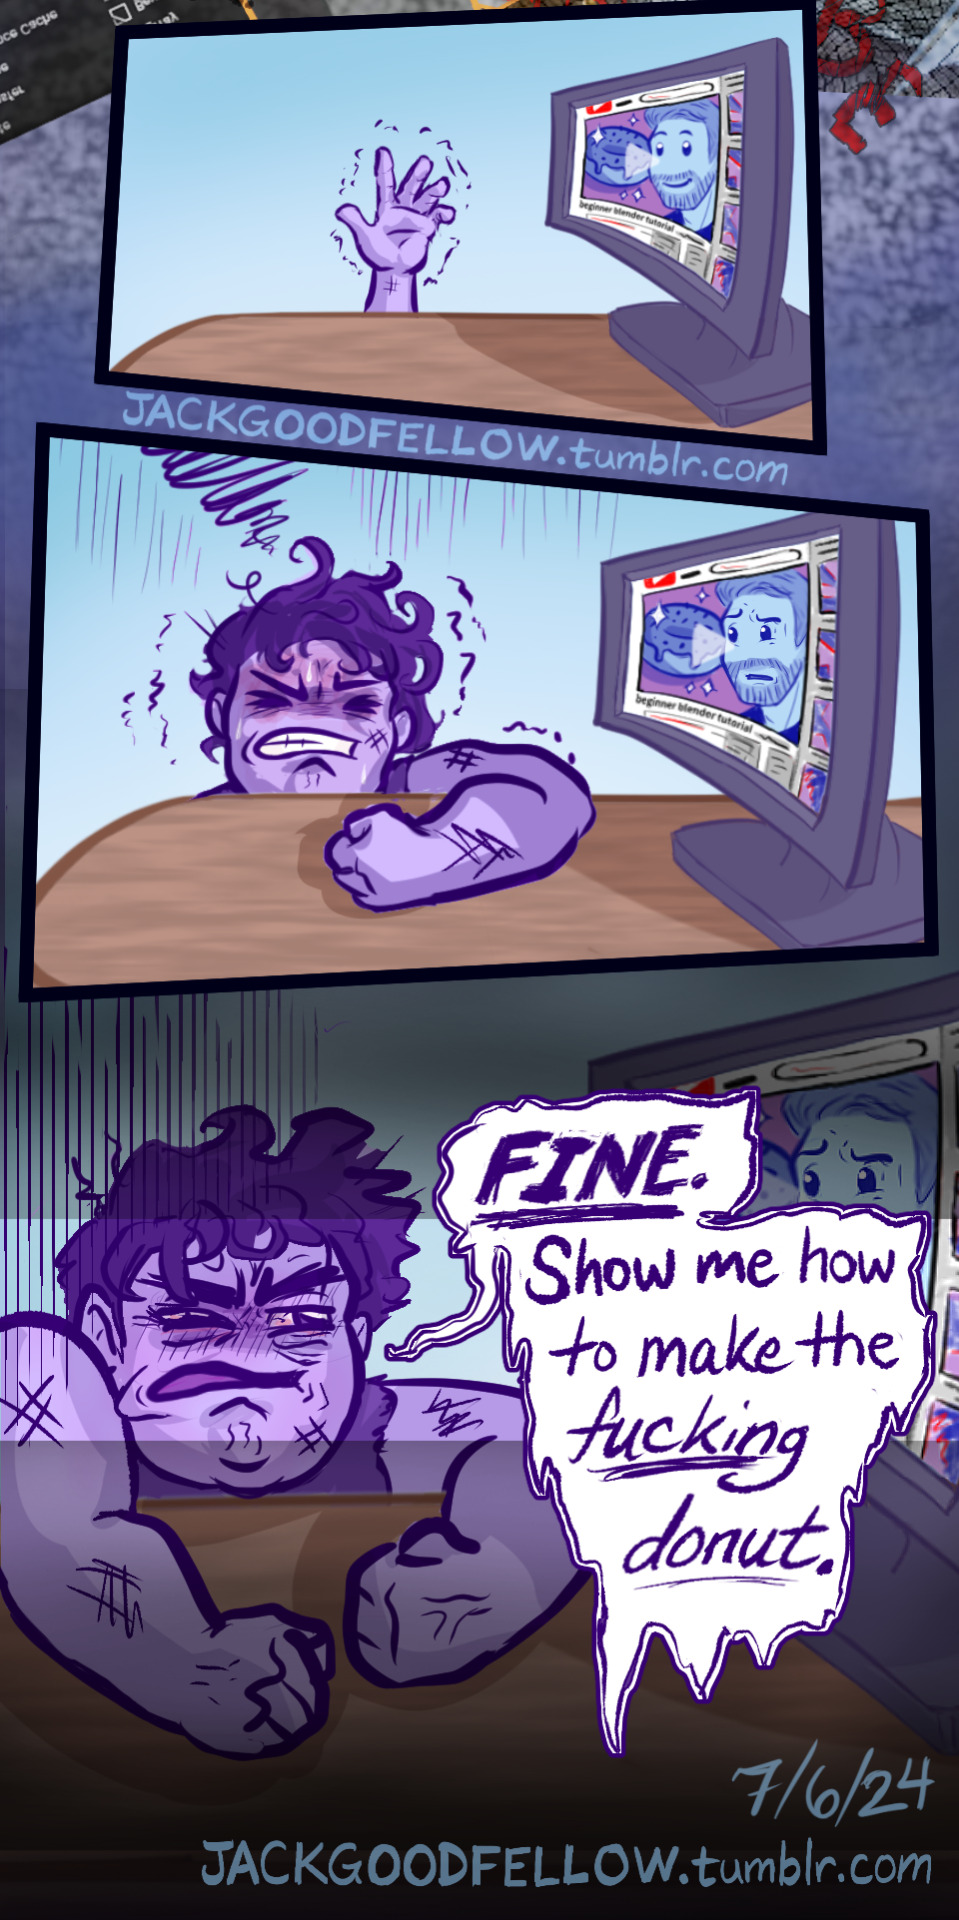
Anyway, it turns out setting art goals according to what Julia from Drawfee can do is like setting swim goals according to what sea otters can do.
#my art#alt-text#image description#blender#blender tutorial#blender donut#blender donut tutorial#learning blender#blender 4.1#blender 4.0#3d modeling#3d animation#3d memes#blender modeling#blender meme#blender community#blender cube#THE CUBE BECKONS#3d artist#julia lepetit#julia drawfee#drawfee
174 notes
·
View notes
Text
I wanted to put this here to show you all something!
Blender defaults to saving PNGs and when you click Render Animation it will give you a giant file full pngs of each frame of your render. then you have to use a separate program to paste the pngs.


You can change the file format to FFmpeg Video and the container (under encoding) to MPEG-4 and it will save the video as an MP4, ready for sharing on platforms such as tumblr.
84 notes
·
View notes
Note
Hey I love your art very much! Just wanted to ask you if you have any ressources/tutorials to recommend for learning Blender?
Hey, thanks for the kind words! Honestly most of my Blender learning has been just messing around with it and looking stuff up as I need it, but here's a couple tutorials that got me started: MortMort's "Blender Zero 2 Hero" tutorials These were very useful in understanding Blender's UI, and come with some tips for pixel art textures in Blender that will be helpful for low poly stuff specifically. Cherylynn Lima's Low Poly Modeling tutorials These use an older version of Blender, so the UI and some shortcuts will be different, but they're great for getting an understanding of the box modeling process used in low poly models. Imphenzia's Low Poly Character Modeling tutorials This is a link to the newer version of his tutorial videos, which goes over the same kinda stuff as the older ones that I used. These were particularly great for getting a quick grasp on rigging low poly characters for animation. Besides those tutorial videos, an additional resource I used was The Models Resource, which collects video game models for viewing in Blender and other 3D art applications. I used this site to study lots of low poly models from stuff like PlayStation 1, Nintendo 64 and Nintendo DS games. I also participated in challenges like #256FES very early on, because I strongly believe that having limitations or challenge goals makes it much easier to learn how a program works. Especially limitations (like 256FES' "use only 256 tris and a 256x256 texture") really force you to learn and puzzle solve to get the most out of your model. My last tip would be: if making your own art is the ultimate goal, then don't feel like you have to learn everything about a program before you start doing your own art. Just get started, then problem solve as you go! It can be fun and gratifying to follow along with tutorials because they produce pretty results in the end, but for me personally I vastly prefer just being creative with a program and figuring out what I need to do as I stumble upon problems. Hope this helps! Good luck on your Blender journey! :)
261 notes
·
View notes
Text
@fragilehiggs
HOW TO IMPORT HIGGS 3D MODEL INTO BLENDER / MODELS FROM GAMES INTO BLENDER
figured id make this a post because it’d be easier.. might help other people too!!! on how to put higgs into blender. you probably know some of the stuff i’m gonna explain but for good measure will bring up. this is extremely long because its the sort of thing i wouldve massively appreciated but i unfortunately instead basically had to figure it out going off of little to nothing
—
blender is a 3d program that allows you to import models from games into there which can then be rigged, posed, and animated. people take these models from games using programs called ninjaripper or greyhound. essentially this just goes into the files of the game and takes out the assets. if it’s an asset, it can be taken out. you would then have to rig the model yourself (basically put a skeleton to pose it.) this takes very long and is inconvenient.
luckily, people do this for you. you don’t need to rip your own assets out and rig, which is a hassle and you usually need to pay for these useful programs. a great spot for getting models that have been ripped from games is deviantart. however, there is no telling how these models can perform. they could be badly rigged, or could have messed up textures. unfortunately, such is the case for the one and only higgs model… https://www.deviantart.com/kanbara914/art/Death-Stranding-Higgs-XPS-864224744
the good news is that i fixed the textures. the bad news is that the rigging is absolutely beyond busy. he is poseable, yes, but the amount of points there are makes it really hard to. i’m yet to figure out a better way and might start ripping and rigging my own models. despite having fixed the textures i am unsure if i can export the fixed version. thus.. another tutorial will come through on to do that. unfortunately it takes awhile. all of this requires lots of patience, trial, and error.
so, now, how exactly do we start? FIRSTLY, we need to revisit downloading blender. the current up-to-date blender will NOT work. you need to download blender 2.80, NOT anything else. well, how do you get an older version?
in order to get an older version, navigate to blender.org/download/previous-versions/ and scroll down a bit to you see ‘download any blender version.’ here is a good tutorial but i believe that it is a little outdated so i will explain it furthermore. https://youtu.be/WmlijP9D67o?si=QHhpOQ_D_0LWJP9M this is the one i followed however so, the premise is the same.
we click on download any blender version and it looks quite overwhelming. dont be too worried, you just need to look closely and scroll till you see Blender2.80 . we then click on that and you need to find your operating system. im going to assume you run windows, and if so, pick blender-2.80-windows64.zip from the list.
navigate to your files, and then open up the zip file that you just downloaded. click blender 2.8 again and then what you see is going to look a little busy. dont be fooled, its actually not. just scroll down and find blender.exe. press this and itll bring up a simple process -- all you should have to do is press a few buttons and optimize it like any other download for an application such as blender. it should be installed like regular blender, and if its not on your desktop, simply go to blender.exe in your files in applications. i recommend pinning it to your taskbar.
here comes the next step. there is something called xnalara. i will keep the history of it rather brief but its quite interesting. xnalara was an older program that allowed people back then to rip models from games and import them into the xnalara program. that program is rather old and i rather not use it, however, im thinking about looking into it. its good to use blender regardless because of its studio-accredited attributes. its professional.
some awesome dude later down the line created something called a xnalara add-on for blender. this allowed you to download models ripped from games posted on deviantart that are optimized for xnalara. the file name for these xnalara optimized models end in .xps . these will not regularly be imported into blender, because it doesnt support it. however, this add-on will allow you to do such.
im going to explain how to download it but watching this video regardless is essential. you will probably need to go back to it now and then.
youtube
since youre particularly interested in importing higgs, i will keep it relatively broad but touch on his model a bit more because i am more familiar but this process applies to most models. navigate to https://www.deviantart.com/kanbara914/art/Death-Stranding-Higgs-XPS-864224744 and scroll down into the description of the post. click on the link, mega.nz/file/y88wyQpS#eDkcsSmW… so on and so forth. it will ask you if you want to leave deviantart and click the link again to go there.
you're now in MEGA. this website will allow you to store downloads for people, and i can assure you its safe. i would never download anything im not sure of -- my PC is my baby lol. look down to the bottom right and youll see "SAVE" and "SAVE TO MEGA." pick save. it will download, and you need to look to the top right and click where your downloads are. this will take a couple minutes, grab some water and a snack. when its done, click on it in the tray to open it.
youre going to be overwhelmed by everything you see. do not fret! just close it, dont unzip it. just make sure it exists. you can close MEGA and deviantart now. you now need to refer to the video i linked if you want to follow along with more resources. we need to install the XNALARA add-on for blender 2.80 which can allow us to put it into blender.
before i continue i want to say, being familiar will blender as a whole will be an insane help. unfortunately the only way i figured out some of the stuff that i did was because i knew how to just going off of the program. most tutorials will not have answers for this small issues... but i most likely do especially for this specific model.
here is the add-on. https://github.com/johnzero7/XNALaraMesh . github will look relatively the same as it does in the video. look to your right, youre going to see a bolded 'releases', and under it, XPSTools v2.0.2 or something along the lines of that. you dont need to see the other releases, it's best to have the latest one. click on it.
its going to open up the description of the file. the above is important to note because it says it works with the blender that you just downloaded. if there are any issues for whatever reason with using blender 2.80 (approximately the version from ~2020) those are other versions which are applicable. for the sake of my sanity im gonna explain how to open it in blender 2.80 .
go down to the bolded 'assets'. under it you will see 3 links -- click on the first one which ends in .zip . it will download in the download tray. if your computer tries to flag it or anything as unsafe, click away from that and allow it anyways. this program has been used by thousands for years. it will soon finish downloading. MAKE SURE THE XNALARA ADD ON IS SAVED ON YOUR DESKTOP!!!
go ahead and open up blender 2.80 now. if you have the newest blender installed already make sure youre picking the older version. it will open a terminal alongside of blender, while its running. dont close it. click general.
if you have never used blender, please watch a video on the basics such as this one. https://youtu.be/Z8sg0nHNTTo?si=zjR4aBHVF8XX_Qdn this is the only way to realistically be able to attempt messing with said model, unfortunately. unironically, rendering roblox avatars was a huge stepping stone and aid to my experience with this. i genuinely recommend you do it before you try and do something like this. here is an amazing, step-by-step tutorial that needs no explaining out of the video. https://youtu.be/kpALOtLhX-Q?si=4UrhkBTIK5qYOBfS
from here, this is a much better tutorial to follow >> https://youtu.be/8mqUqob3P3o?si=14a50v88IPZx6O8Y . find yourself at the time stamp of 1:46, the previous is the steps you have already done. go back to blender if you have made it this far, lmao. click on the cube and delete that motherfucker.
look at the top toolbar. it says things like file, edit, render, window, etc. you want to pick edit and scroll to preferences. youll see many options but youre going to want to click add-ons on the left. then, at the top left, click install. go to DESKTOP and click XNALaraMesh.2.02.zip and click install add-on from file on the top right. make sure its the ZIP. this is gonna bring you to a menu with potentially many other downloads. scroll down till you see XNALARA if so. MAKE SURE IT HAS A CLICKED CHECK MARK ON THE LEFT.
go down to the three bars on the bottom left and make sure to save preferences. you can then close that and go back to blender. it will now be one of your downloaded add-ons available! go to the top left again and hit file, import, and XNALARA / XPS. itll hover and youll see another option. make sure to pick XNALara/XPS Model (ascii./.mesh/.xps) . click it and pick Load an XNALara model file.
this will open up your file explorer within blender. click desktop and click on the higgs model you saved earlier. clicking it will lead to 2 files, click xps.xps . press Import in the top right. it will take a hot minute to pull everything into blender, be patient. once its imported scroll inwards and look at the son of a bitch. the rig is gonna be highlighted orange and hes gonna be gray. click to anywhere other than the model and face the enemy.
due to the shading settings, his textures arent showing. simply go to the top left where you see 4 ish circles, the second one should be selected. select the one to its right, viewport shading, and give it a second to load his textures in. its gonna look nothing like him. youre gonna have to fix the textures, brave soldier.
--
will post another tutorial if you decide to go through with this or if anyone does because unpacking all of that is such a pain in the ass but i promise it isnt rocket science. just not gonna do it if it isnt asked for because i spent 3 hours figuring out how to fix it the first time i imported his model -- the creator says nothing about this on the download or how to fix it unfortunately and its quite janky :(
if you even made it this far in reading, congratulations, youre a winner. IF YOU HAVE ANY QUESTIONS AT ALL PLEASE FEEL FREE TO ASK and i will answer them to the best of my ability.
SAVE THE IMPORTED MODEL TO REVISIT!!!!!!
#this took me so fucking long lmao#xnalara#blender#3d model#3d art#3d modeling#blender3d#ds higgs#higgs monaghan#higgs#death stranding higgs#tutorial#tut#tutorial blender#blender tutorial#xps#xnalara xps#Youtube
18 notes
·
View notes
Text

Blender Breakthrough: Shaders & Grease Pencil Fun!
Hey everyone!
Big news from my Blender bench today—I cracked shaders and played with the grease pencil! This tutorial made it all click. Shaders? Less scary now. Grease pencil? A total game-changer for drawing on 3D models.
youtube
Can't wait to see how I can apply these new tricks in my next project. Stay tuned!
146 notes
·
View notes
Text

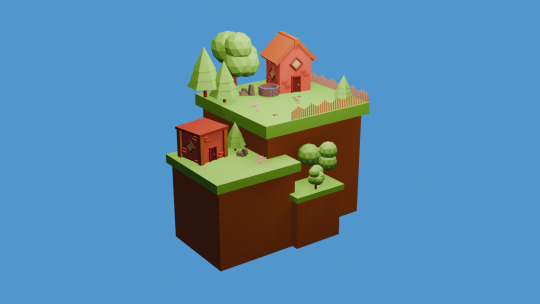
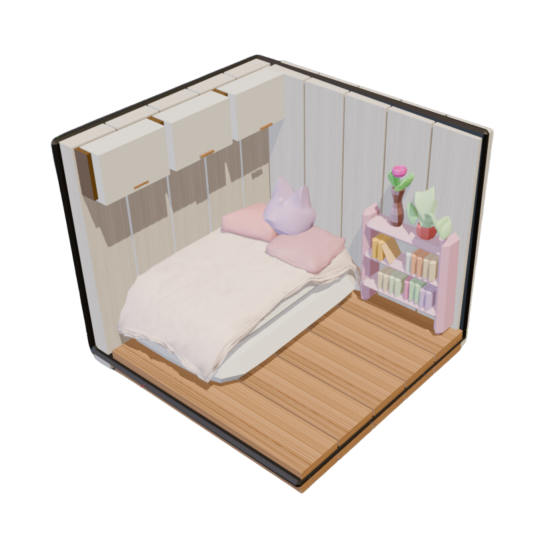
More blender practice. My take on the cosy bedroom scene.
21 notes
·
View notes
Text
after spending several hours pouring over an hour long blender tutorial i have finally come out with something nice! thank u to joey carlino (link under cut to the vid)
youtube
23 notes
·
View notes
Text

really loving how this isometric kitchen came together! ✨️💖 youtube tutorials are a must!
one of my favourite things about setting up a fake room is the clutter - regardless of how clean a space is, we always will have some clutter! i find it adds the extra touch of realism 👌🏻 (if you play the sims, you'll understand)
#blender#3d model#3d room#3d art#blender tutorial#isometric#aesthetic#freelance artist#art#isometric kitchen#cute kitchen
123 notes
·
View notes
Text
How I do my lighting in EEVEE for Blender 4.0 (´。• ᵕ •。) ♡
Are you running your Blender on a toaster? Don't wanna spend much time on rendering in Cycles? Here's some EEVEE tips for you!
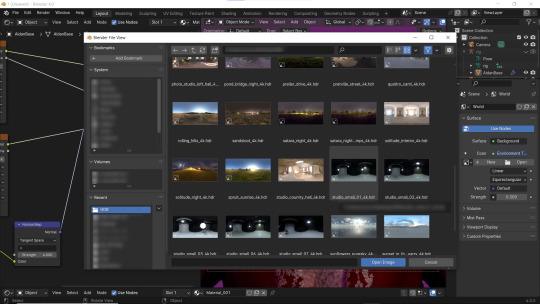
1 - Let's put some HDR lighting on! Go to the Worlds, choose Use Notes and hit that little yellow dot next to the Color.
2 - Pick 'Environment Textures'
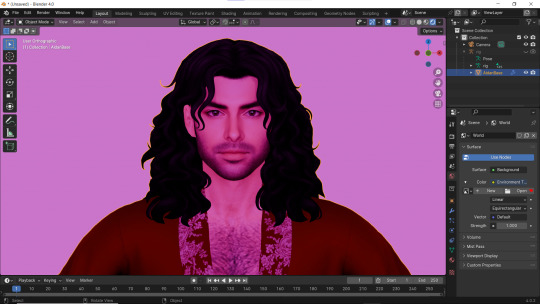
3 - You'll see everything in purple. But worry not! It's just bc you haven't applied any textures yet! Just go on and hit Open.
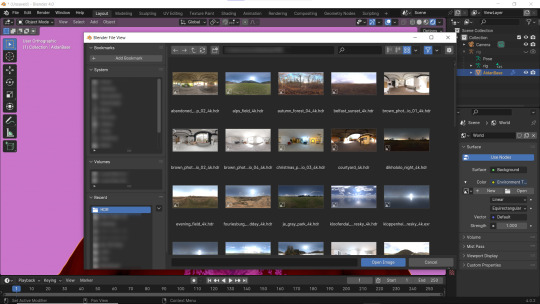
4 - You can find plenty of free, high resolution HDRI textures on Poly Haven. I have almost all of them! Go get some for yourself too and navigate to their location. Pick any you like!
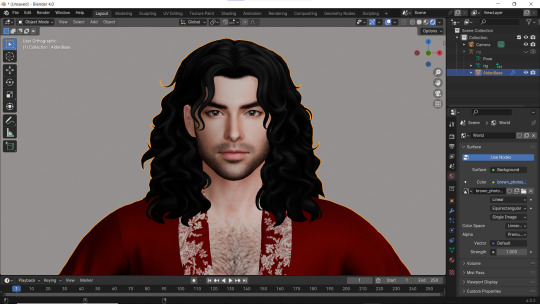
Well... It doesn't look good yet :D
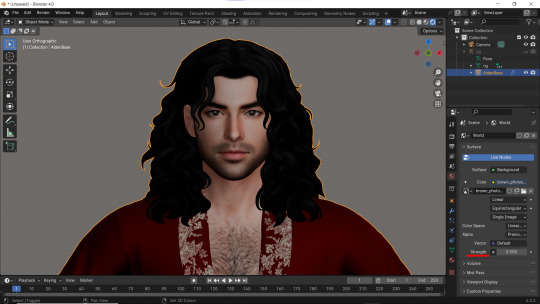
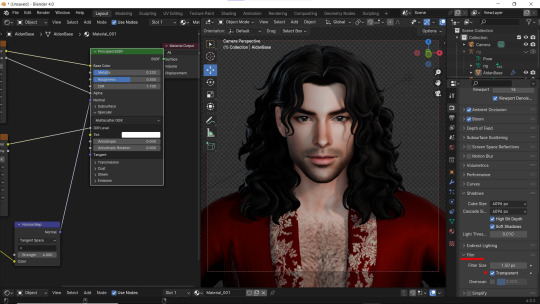
5 - Lower the Strength of the light.

6 - Now. Let's go to the Render Properties and check Ambient Occlusion and Bloom (you can play with it's parameters and see which fits you better). THEN... Go to Shadows and increase the resolution to the max. High Bit Depth and Soft Shadows must be checked too!
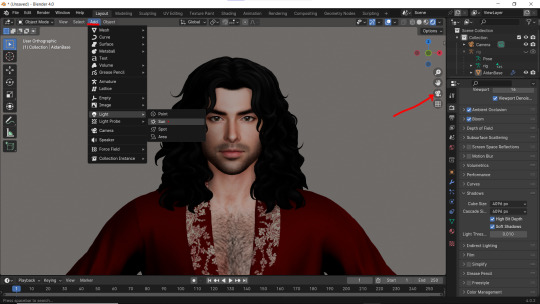
7 - Let's Add our very first light (The Sun)! And go to the Camera Mode.

8 - In the Sun Shadow settings: Soften the light by increasing the Angle; Lower Bias to the max.
9 - Change the parameters of Cascade Shadow Map the way it looks better for you.
10 - Also don't forget to fix the specular appearance of your model ;3
Now. I don't hate it. But I don't like it much either... So I played and tried several Environment textures for better result.
11 - Looks way better! Now let's go to the Render Properties once again and remove the background in the Film category (in case you don't want one)
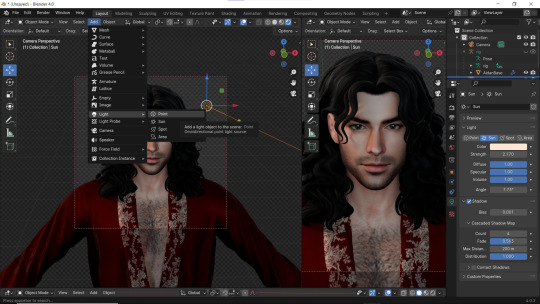
12 - It's time to add another light source!
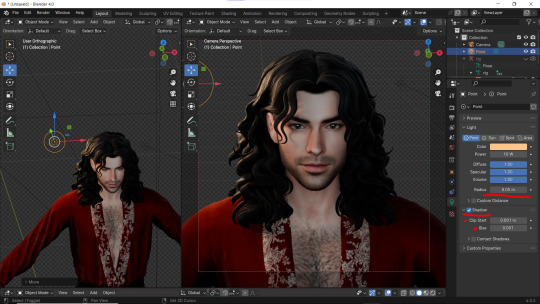
13 - Settings for the new light are quite similar. I made them softer, lowered Bias, changed color, etc.
14 - Preparing for the shoot. ▓▒░(°◡°)░▒▓
15 - You did it! (ノ◕ヮ◕)ノ:・゚✧
#WistfulTutorialSims4#the sims 4 blender#sims 4 blender render#blender 4.0#blender eevee#sims 4 tutorials#blender tutorial#sims 4 blender render tutorial#blender render#blender eevee lighting#blender environment textures#sims 4 blender#blender render eevee#blender light#blender light eevee#eevee#blender#simblr#the sims 4#my sims
149 notes
·
View notes
Text

Learn how to create a 3D heart in Blender with my quick and easy YouTube tutorial! Perfect for beginners or anyone looking to add a little love to their 3D projects.
I know this is a bit different to my game I normally post, but I also love helping people learn. If you want more tutorials please sub to my youtube channel :)
#blender#gamedev#blender tutorial#youtube#game development#video games#youtube video#3d model#indiegamedev#3d art
8 notes
·
View notes
Text
A simple isometric room made in blender ✧・゚: *✧
#blender#3d model#3d room#3d art#blender tutorial#isometric#aesthetic#freelance artist#art#coquette#coquettecore#pastel#pink
7 notes
·
View notes
Text

Introducing "Jojo" my newest face sculpt. After MONTHS of failed attempts (and procrastination), I finally figured out how to split a mesh to create a mouth and put teeth inside. So many google searches and forum posts told me the only answer was retopologizing the mesh, which means creating an entirely new, but simplified mesh in the shape of the one I've already made in order for me to create an opening in the face. I just couldn't accept this and so I started experimenting with masking in Sculpt Mode.
Here's a short pictorial for my future self and anyone interested in trying this out:
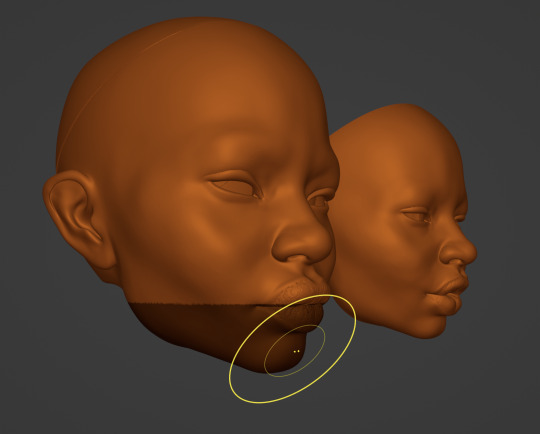
First you enter SCULPT MODE and press "B" to start a box selection. Create a box selection in between the top and bottom lip. The selection should include the bottom 3rd of the face.

Now that the area is masked, invert the Masked selection using CTRL + I or Command + I. This keeps the rest of the head safe from any changes as we shape the jawline and chin area. When the mouth opens, it curves backwards rather than moving straight down. If you place your hands on your jaw as you open and close your mouth you'll see what I mean. For this reason, we use reference images and press "G" to grab medium to large sections of the unmasked jaw and chin to push it into place. A subtle, incremental approach is very important during this step.
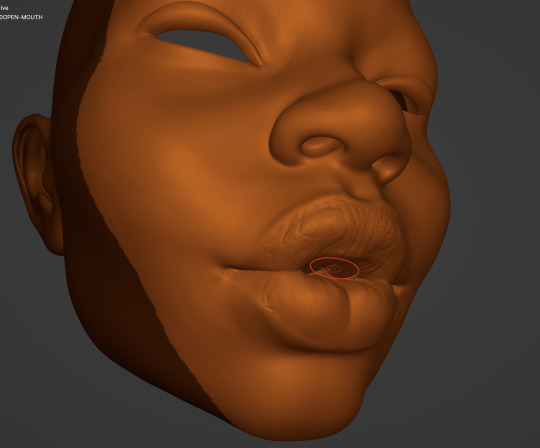
Now the mouth is open but crowded with meshy nonsense. Clear the inverted mask by pressing ALT + M or OPTION + M. Delicately Smooth the artifacts that may have appeared around the edges of your dissolved mask. Then you can apply a new box selection to protect the rest of the face as you work on the mouth.
Clear out the mouth by using "Crease" to sink the cavity inwards and give shape to the mouth. "Draw Sharp" may also be useful here. Take care to "Smooth" out this area without reintroducing that meshy nonsense.
Then there's the final step!

Add in the teeth! Here I am using a model I downloaded from generous creator on Sketchfab. (View credit below.) I positioned and scaled the mesh as much as I needed to for the look I wanted. As you can see in the first image, I altered the teeth mesh quite a lot for a more dramatic look.
I used "G" or grab to shape the lips around the mouth to match my reference photos. I also used "I" to inflate parts of the lips and "C" to crease the middle of the bottom lip.
Then Voila! I finally found a solution and immediately used it on a separate mesh to create Jojo! You can find the secondary mesh here: "Human teeth" (https://skfb.ly/6xVZO) by Alexander Antipov is licensed under Creative Commons Attribution (http://creativecommons.org/licenses/by/4.0/).
16 notes
·
View notes